|
This was by far the best MCTLC I have attended! There were more breakout sessions available as a whole, and the sessions were divided into 4 different strands. Needless to say, it made choosing which sessions to attend both easier and more difficult as there were so many amazing options. Here is how I spent my time and what I took away.
The Highlight Reel or Highlight the Real with Meredith White This session was all about getting real in the classroom. Meredith shared a number of tips and strategies to streamline teacher efficiency in the classroom. My takeaway: use pre-made stamps (or stickers) to offer feedback. Meredith had a number of stamps that provide instant feedback for students. For example, one stamp had 4 proficiency levels on it. Meredith could simply stamp a student’s paper and check/circle the proficiency level they were demonstrating. Another stamp had an arrow with the commentary “my favorite part.” So simple, and still providing feedback to students. As an additional bonus, I ended up sitting next to the amazing Kara Parker of the Creative Language Class blog. #starstruck Playing to Proficiency with Brooke K Carlson This is the second time I have attended one of Brooke’s sessions, and she never disappoints. Brooke uses OWL strategies in her classroom and she shared simple ways to get learners to engage in the TL. My favorite was her use of a continuum line. Here is what she tells students - in the TL, “If you love, love, love dogs, head to the [north] side of the room. If you love, love, love cats move to the [south] side of the room. If you are okay with either, move the center. If you like dogs more than cats, but don’t love, love, love dogs, stand somewhere in between the [north] side and the center.” Students form a line and you can instantly tell how they feel about cats or dogs. From here, you can do some great PQA. However, Brooke follows this up by having students turn and talk to the person standing next to them in regards to why they are standing where they are. Using the AAPPL Test for the MN Seal of Biliteracy by Krista Picha AND Answers to Your Questions about Bilingual Seals and World Language Proficiency Certificates by Ursula Lentz These sessions were ones I was waiting for, as I am hoping to offer my students the chance to earn the Seal of Biliteracy this year. Krista’s school has implemented this for a number of years and she shared her journey. My takeaway from this session was to be sure to get students speaking the TL, as they usually have the lowest proficiency in the Interpersonal mode. Ursula works for the Minnesota Department of Education and presented so much factual information about the Seals. What really surprised me was the number of districts that are currently offerings Seals of Biliteracy. The number is lower than I expected, and while Ursula did not have the exact data in front of her, she put the number at around 30. Inspiring and Acquiring through Music by Carol Gaab When is a Carol Gaab presentation ever NOT engaging? This was no exception. Carol shared numerous strategies to help students repeatedly engage with a song and its lyrics. My favorite was probably a pre-listening activity. Simply put song lyrics in a word cloud and have students make predictions as to what the song is about. Also, be sure to have them justify their predictions based on what is in the word cloud.I have heard/learned about this activity numerous times, and this year, I am vowing to actually do it in my classroom. Unwrapping Proficiency by Paul Sandrock This was a full day session on Saturday, presented by ACTFL Director of Education, Paul Sandrock. This session was amazing! Paul explained the different modes of communication and the ACTFL proficiency levels with precise clarity. My takeaway from this training was students need feedback. They need to know what their proficiency level is, and what they can do to “level up.” However, feedback does not need to be in the form of a summative assessment. It can be in the form of multiple, simple formative or even informal assessments. Thank you so much to our MCTLC Executive Board for the many hours they volunteered to offer World Language educators a fantastic conference this year! If you did not have the chance to attend, you can still get valuable snippets from the presenter resources found here. Enjoy!
0 Comments
Why? If you are not housing texts in a google shared folder, accessible to your students, now is the time to do so. In doing so, students have access to comprehensible texts at the touch of a button. By housing all class created texts in one common place, students are able to do any number of things with them. They can easily open a previous text and translate or illustrate it. Or read a text from a different class (I teach 3 sections of Spanish I) and find similarities and differences between students in that class and their class. Or they can highlight specific target structures or vocabulary structures. Or add X number of details to the text (if they use conjunctions and connecting words this helps students level up on proficiency levels as well!). Or any number of other post-reading activities. Or build your FVR library with these texts. A shared folder full of comprehensible texts is also great for emergency (or non-emergency) sub plans. What? At the end of each class period, I do a Write & Discuss with my students. Basically, the students and I co-create a text about what we discussed in class that day. In my situation, I use a doc cam, so I have a physical copy of the text on paper. You can also write the text directly on an interactive whiteboard and save it, or on a traditional whiteboard and take a picture of it. Whatever your situation is, just make sure you have a record of what you created during Write & Discuss. During my prep period, or at the end of the day, I spend about 10 minutes typing each class’s Write & Discuss in a new google doc in the appropriate shared google folder. The majority of texts in the shared folder are these - comprehensible texts that the students and I have created. However, the shared folder doesn’t need to be limited to Write & Discuss texts. Any text you create with your students can be placed in the shared folder. Mine houses our Persona Especial facts (Persona Especial is from Bryce Hedstrom), slideshows from songs we listen to and artists we learn about (Kara Jacobs is the inspiration for this. Check out her examples here and here), and stories about our Invisible characters (Tina Hargaden & Ben Slavic are the creators of this great idea). How? File and document organization is key! First, create a new folder in your google drive. Mine is labeled as Student Shared Folders.  Within this folder, create a separate folder for each level you teach. Name each folder with the school year and level. As students move from level I-II, the folder stays with them; simply rename the folder to include the current school year and the new level. Change the color of the folder to green. When a level “graduates,” change the color of the folder to gray. This allows a quick visual reference as to which folders are active. 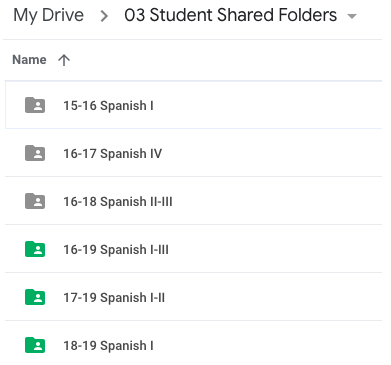 When you are ready to create a new text, open the folder where you would like to house the text FIRST. Doing so avoids moving it later. Open a new google doc (or slide presentation, etc) and type your text. Here is where file organization is a must!! The way in which I name each of my texts corresponds with class period and date of creation (year, month, day). For example doc 3-180906 was created by 3rd period on September 9, 2018. However you decide to name your texts, be sure to share the way in which you do so with your students so they know how to access texts when needed. 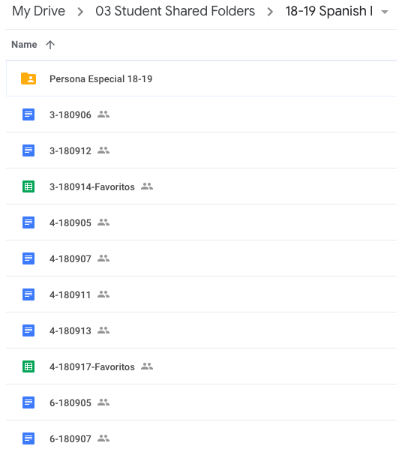 Once a class folder has been created, with a couple of texts housed inside, share the folder with your students so they have access. From the drop down menu on the name of the folder, select “Share…” 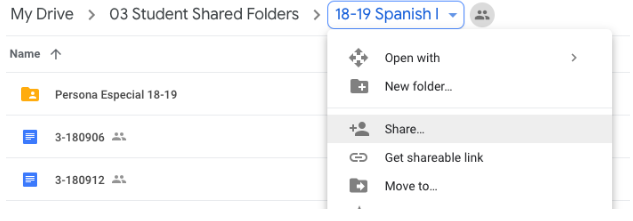 Choose who has access and make sure they can VIEW ONLY. Use the “Copy Link” button to copy the link of the shared folder. You can post/e-mail this link to your students so they can access the folder. 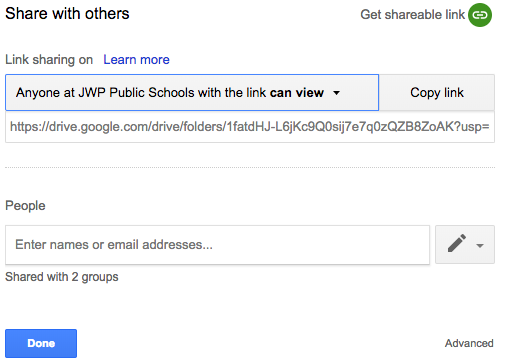 I post the link to Google Classroom as that is the most efficient in my situation. Additionally, I ask that students add the shared folder to their Google Drive so it is even more accessible. (No scrolling through Classroom to find a random post.) To have students add the folder to their drive, they select “Add to My Drive” from the drop down menu on the folder’s name.  Students now have access to all the texts we create and use in class.
Happy comprehensible reading! Calling all Señor Wooly fans. I created a breakout that mashes together five of his songs: No Voy a Levantarme, Puedo Ir al Baño, No Lo Tengo, La Dentista, Pan.
The inspiration for creating this breakout is from my amazing Spanish III students. Before the last month of school, I asked my Spanish III students how they would like to spend our time together in May. They were all seniors, so I felt that giving them some choice in what we did in the classroom would help alleviate the senior slide. All the students said they would like to watch more Sr. Wooly videos and many said they would like to do a breakout box. Great, I thought, I can combine the two. Needless to say, my students and I had a blast as the end of the year was nearing, and we were still acquiring language, but doing so in a way that was meaningful and enjoyable to all. Before the seniors left to embark on their new adventures, they did one more breakout box...with great success. They truly enjoyed it , and I hope your students will as well. You can find the google drive folder with everything you need here. Happy escaping! I am currently using Martina Bex’s SOMOS curriculum in my classroom (which I love!). This year, during Unit 4: La Universidad I chose not to storyask, because I felt my students had already acquired 2 of the 3 structures. Instead, I chose to do a few supplemental activities to get in the necessary reps of the target structures, and spiral the others. One activity that I did is called Sentence Diagrams. I learned about this activity years ago when I attended a workshop with Barbara Snyder. She was presenting a workshop centered around interactive, learner-centered activities.
Sentence Diagrams is designed to get students talking with one another. It also helps to create the repetitions of vocabulary needed for acquisition. The caveat is that the conversation is canned, and not spontaneous. However, I like to use this activity sparingly in my classroom because it does provide a nice break for me. I can take a 10 minute break from providing constant CI to the students, and get them to listen to each other. There is some prep involved, as you must create the sentences diagrams. Basically, it consists of three columns of text and/or images. The example I used for this unit is here. Here’s how it works. First, each student needs their own paper. They fold the paper down the middle so that there are now two identical sides. On one side, students draw lines connecting each column. In the Universidad example, students connect a name to a class image to a profession image. There is no correct way to connect columns; students can and should connect columns that do not “make sense.” For example Student A draws a line connecting Paco to Spanish class to veterinarian. (This may or may not be considered a logical connection.) Now, students pair up. Student A will “read” the sentences they “wrote” to Student B. Student B will listen and on the side of their paper where they have not drawn lines, they will draw the lines their partner reads to them. Student A reads all of their sentences while Student B draws lines. So, in the example above, Student A would read/say: “Paco toma la clase de español porque quiere ser un veterinario.” When Student A has read all their sentences, Students A & B can compare. Their lines should be identically drawn. Repeat with Student B. They now “read” their sentences and Student A “draws” the sentences. As a follow up, together, students can find the most logical or illogical sentence. Students can actually write out a few sentences. To increase proficiency level, students can add “because” to their sentences. Students could draw their sentences and complete a gallery walk, etc. The sentence diagram activity can be used in varying contexts also. Here are few that I have used throughout the years:
I have always tried to use music in the classroom, because I really want students to experience the joy that music can bring, regardless of a language barrier. However, I have never really figured out a seamless way to integrate it into the daily flow of my classes. Additionally, my students have never seemed to share my enthusiasm for music in the classroom. With all that, I decided that this was the year I was going to take the month of March and do a March Madness bracket with my classes. If you are unfamiliar with March Madness, check out the spanishplans.org website found here. During March, we listened to two song refrains each day and voted as to which was the class favorite. During this time, the students did not seem overly engaged or enthusiastic, and honestly, I was again wondering why I bothered to incorporate music as it seemed like it was a waste of time when I could be using those precious minutes in a more effective manner. This was essentially true for the entire month of March. I was introducing music and the students were (very) passively tolerating it. In the end, the students did liven up a little bit, but nothing to the level that I would consider the payoff worth the time spent doing the activity.
OK, time to assess. Was the class time I was using beneficial, or could I use the classroom to provide more comprehensible input? I really did not want to give up on music this time, and I know from experience that not everything is initially successful in the classroom. I decided to try a song of the month, similar to what Annabelle Allen does in her classroom. Kara Jacobs and others use a song of the week, but I was not ready to commit to that level of involvement. I chose to use the song, Sofía by Álvaro Soler. I knew it was a catchy tune, and as a bonus, Carrie Toth and Martina Bex had already created materials to use with the song. Bonus for me, I had no “wheel” to create. In Spanish II, we did a couple of the activities, and listened to the song. Again, with passive results from my students. I was so discouraged, I was ready to quit the whole music thing all together. Apparently, music is something others can get to be successful in their classrooms, but for me, it just didn’t seem to be working out. After two hours of brooding about my lack of success, one of my Spanish III students came into my classroom and asked what song I had played earlier in the day for my Spanish II class. Apparently one of her friends told her that she listened to the BEST SONG EVER in class today and wanted it added to their softball playlist. Wait...what? Then, another Spanish III student came into class and asked a similar question. Wait...what? Apparently my Spanish II students were creating a buzz about Sofía. Finally, results I had been hoping for - students actually enjoying music in Spanish. However, the story gets even better, remember the part about a softball playlist? Unbeknownst to me, our softball team has a playlist that they listen to as a pre-game warm up for home events. The previously mentioned Spanish II student wanted Sofía added to the playlist, however, wasn’t sure if they should add the song or not because they already had TWO Spanish-language songs on their playlist. Wait..what? Yep, already on their playlist were two songs that we had listened to during March Madness. Again, I guess all that passive listening that I saw on my end, really was much more than that. I am happy to say that the softball pre-game playlist now has THREE Spanish-language songs on it. But wait, there’s more. Since the playlist incident, I have come to learn that a number of students have songs from March Madness on their personal playlists! (YEAH!) Another student shared that he was eating in a Mexican restaurant when Esperándote (a March Madness song) came on over the speaker. He recognized the song, and started singing along! In front of everybody in the restaurant, including his mother. (YEAH!) So, lesson learned. Our students truly are icebergs. We see them in class for such a short amount of time, but beneath those glazed eyes and sluggish composure, they really are listening. More than I knew, at least. As such, music will henceforth be a staple in my classroom. We all have those days. Homecoming days when there are only morning classes since the afternoons are dedicated to activities. Days at the end of the semester when you don’t want to start something totally new. Late start days when classes are cut short of minutes. Days when we just need a break to recharge. Today was one of those days for me.
Today a science field trip left me with half filled classes throughout my day. I didn’t really have enough students remaining in class to move forward, so I was left with the question...what do we do today? And better yet, what do we do today with minimal prep? Thank goodness for Zach Jones and the amazing resources he has on his website, zambombazo. (side note: If you are not yet familiar with the site, it is filled with incredible, FREE activities. I would, in fact, encourage you to stop reading this blog and visit the site - it is that awesome and worth your time.) At any rate, with the students I had in class today, the plan was to do a stand alone lesson but yet engaging and CI worthy. I chose to base the lesson plan today around the one of the students favorite talking points: movies We began class with some general PQA about what movies they liked to watch, who they went to the movies with, which movie theaters they preferred, etc Students then paired up and completed a pelipareja activity from zambombazo. Pelipareja is an activity where students match a brief description of a movie to its poster. After most pairs had finished the work, we shared the answers to make sure everyone was on the same page Next, I asked students to choose one of the descriptions and work with their partner to translate it to English. This was a great activity to see how students were able to identify cognates and unknown words through context. My Spanish I students were able to translate a description of their choice without any problems To extend this further and get more reading practice, I asked each pair to identify two words they did not know the meaning of, but were able to figure out through context. They could choose the words from any of the descriptions other than the one they chose to translate. Students shared the words they learned from context while I wrote them on the board and personalized each one through personalized question and answer (PQA) With the minutes we had remaining, we played strip bingo with the words identified by the students. Overall, a pretty successful CI lesson plan with minimal prep. My favorite kind of lesson plan for “one of those days.” I would bet that many of you have student jobs in your classroom. I do too. And I recently added a new one to the class: Digital Artist
This job grew out of a need to create more visual support for the stories we create and read, as well as more visual interest. This job is also possible because our students have excellent access to technology. My district is 1:1, which makes this job very easy for the Digital Artist; however, this job could also be done if the Digital Artist has access to any type of device that allows for an online connection. On days we create stories, it is the Digital Artist’s job to listen carefully and find digital images of characters, main ideas, or details found in the story. At the beginning of the story creation process, the Digital Artist opens a new document (we use Google) and a search engine (such as Google). As the Digital Artist listens to the story, she searches the Internet to find school appropriate images that relate to the story in some way. For example, if a young red-headed boy becomes a character in our story, the Digital Artist can find an image to fit that description. If our characters are going to the beach, the Digital Artist can find an image of a beach that will add interest to the story. When the Digital Artist finds an image she likes, she adds it to the document. As the story is being told, the decision about what images to include and leave out are up to the Digital Artist. I do not set a minimum amount of images to include or limit the Digital Artist to search for images related to specific story elements. The images chosen are strictly at the discretion of the Digital Artist. The only requirement is that the images be appropriate for school. The Digital Artist also works closely with the Story Writer to verify any details as the story is being told so as to find correct images. After the story is completed, the Digital Artist shares the document with me; the only thing on this document are images relating to the story. From here, I use the Story Writer's notes and type our class story on the document the Digital Artist shared with me. Often times, I do need to resize images and wrap them so the text will fit, however, this is a pretty easy job when done on a Google or Word document. I now have a typed class story, with images, that we are ready to read the next day. The students love seeing the chosen images the following day! Additionally, I print these stories - in color - to add to our classroom FVR library collection. I also have a Google drive shared folder that contains all of our class stories. If a student was absent the day we created a story, I simply can direct him to the shared folder to read what we created in class when he was gone. Examples: No Quiero Ir Miedo del Paquete **If you are new to the concept of student jobs, please read more from Bryce Hedstrom or Ben Slavic. 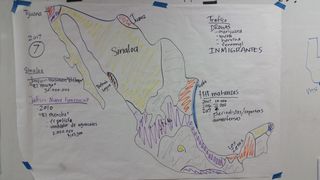 In Spanish III we are getting ready to start reading Fiesta Fatal. In the novel, the main character, Vanesa, and her mother must flee from the cartel. In order to understand the urgency and fear they feel, I am front loading some information about Mexican cartels. Using CI and CALP methods, the plan is to take four days to teach the topic.
Day 1: Gallery Walk After posting these pictures around the room, pairs of students walked together, discussed the images and wrote their observations. Once pairs had a few observations written, we discussed them as a class (following the method explained here by Tina Hargaden, around the 6 minute mark). As a class, we wrote down the observations, questions that arose via discussion and any predictions students had. Day 2: Information Flood Students again worked in partner groups. Each pair was given an article to read relating to cartels. (There were five different articles.) Students read their assigned article together with the purpose of pulling 5 pieces of information from the article. It is important to stress to students to focus on what they KNOW and not what they don’t. Some of these article were far above their proficiency level, but all still managed to get a main idea with a few details because I stressed that they did not need to understand every word and focus instead on what they could figure out. After each pair recorded five pieces of information, students formed jigsaw groups and shared what they had written down. (Jigsaw Groups: Student A in each pair became #1, Student B became #2; all #1 formed a group and all #2 formed a group.) Once each member shared their 5 pieces of information, they collectively chose the 5 most important facts about cartels. It is important that they choose the 5 facts, as this helps to reinforce small group discussion skills as well as critical thinking skills. In other words, I did not direct them to choose 1 fact from each article, students had to think critically and work together to find 5 facts that they determined were the most important. The "new" top five pieces of information were then shared out with the large group and discussed as to why each group chose accordingly. Day 3: Input Chart I presented an input chart based on information primarily from a BBC article. Using comprehensible input, I told students about the various cartels in Mexico and the territory they currently control. I talked specifically about the two largest cartels - Sinaloa and Jalisco Nueva Generación. I also talked about the deaths/killings related to cartels (stats only, I did not go into detail about specific murders). I wrapped everything up with what the cartels traffic into the U.S. and why the market is so large - U.S. demand. Day 4: Cooperative Paragraph Finally, to tie everything together, we created a cooperative paragraph (or two) based on what we learned about Mexican cartels. The information came from observations from the Gallery Walk, the collected information from the articles and the Input Chart. As an assessment, students read this article. I adapted it slightly to make it a bit more comprehensible. They also completed an an interpretive reading assessment based on the article. If you are looking to expand your unit on Mexican cartels, or are looking for some different options, Kara Jacobs has a large unit built around music, narcocorridos to be exact. Carrie Toth has students watch a National Geographic video and follow up by creating infographs. I have been trying to incorporate more reading into my classroom lately, but have been looking for something other than a simple partner read or volleyball read. And as Carol Gaab states, “The brain craves novelty.” With that, I have re-discovered an activity that I once used often, but have not used for quite some time: Match ‘Em. In order to give credit where credit is due, I was introduced to the idea long ago at a BER conference. Barbara Snyder was presenting on communicative activities for the classroom, and this was one that she shared with us. Essentially, Match ‘Em is a pre or post reading activity that practices skimming and scanning skills, while sneaking in those extra reps for acquisition.
What is it, exactly? Quite simply, Match ‘Em is a list of sentences. Begin by creating a list of true statements, and a list of false statements. The statements could be based around a recent story you have asked in class, a chapter you are reading in a novel, or a few statements about a recent PQA session. Take the list of true statements and make 2 copies, one for Student A and one for Student B. Take the list of false statements and divide it in half. Add one half to the list of true statements for Student A; add the other half to the list of true statements for Student B. Scramble both lists so that the true and false statements are intermixed. The statements should also be in different orders that one another. Students pair up. Student A chooses a statement to read to Student B. Student B skims and scans his list of statements to find the identical statement. If Student B locates the identical statement, it is true and both students mark the statement as such. If Student B can not locate that sentence, it is false, and Student A will mark the statement as such. Now, Student B chooses a statement to read to Student A. Student A skims and scans his list to find the identical statement, etc. Once partners have completed the activity, there are a number of options to do as a follow-up activities. Follow-Up #1: Sequential Order After finding all the true statements (based on a novel chapter or class story), have students put them in sequential or chronological order. Follow-Up #2: Draw It Students illustrate one of the true statements. Use their illustrations to create a formative listening assignment the next day! Follow-Up #3: Front-load Information Use the true statements to front-load some information that your students will need for an upcoming class story or novel chapter. For example, if your class will be reading Fiesta Fatal by Mira Canion, you could create true statements about the settings of the story or true statements about quinceaneras. This could lead into a discussion that could help build background knowledge which aids in reading comprehension. Can I see an example? Yes!! I have provided an example of the steps and a completed activity here. The statements are based on Sr. Wooly’s story: No Quiero Levantarme, which is one of my favorite Sr. Wooly videos. Enjoy reading!! Recently, I came across two different blog posts that have opened up a number of possibilities for my classroom. The first post was from Martina Bex; she was discussing the endless possibilities of using the Fan N Pick activity, a Kagan strategy, in the classroom. The second post was from Alice Keeler; she was sharing how google slides can be used cooperatively in the classroom. Alice’s post got me thinking about using more technology in my classes, while Martina’s post gave me the concrete idea of how to do so.
Here is the result of the inspiration. With a few minutes of class remaining one day, we began the storyasking process and outlined all of our characters. This was as far as we got. No plot, no conflict. Just the creation of 4 characters that would be in our story. That evening, I went home and created a google slideshow (here) that included instructions and a number of slides - enough for each student. My goal was to have students search the Internet for images that could represent the characters we described in class. For example, one of our characters, Greg, was a 9,000 year old vampire and father of 2. Their task was to find one image of one family member. When students arrived to class the following day, they were instructed to visit google classroom and open the slideshow I had posted there. I reviewed the directions with them, assigned each a number corresponding to the slide they were to work on, and gave them a time limit to accomplish the task. The results were AMAZING!! They LOVED seeing everyone else’s submissions in live time. Once the work time was over, I instructed everyone to close their Chromebooks and the real work (disguised as fun) began. Since I have classes of about 20, there were 4-5 images of Greg as well as the other three family members from our story. For each family member, we looked at all the images that represented him/her while I circled each one (hair color, attitude, etc.). We then voted on which image would represent each family member in our story. As a follow through, when students came to class the next day, I had a typed version of their story, complete with the images they had selected to represent the characters. The students loved seeing the images they had chosen to represent each character of our story. They were also more enthusiastic and engaged with reading the story with the addition of their images. As I mentioned earlier, Martina’s post gave me the inspiration for this idea, but it also got me thinking about how else I could use google slides collaboratively in my classroom. Order of events List 4-5 events that could be placed in logical order. Create a “master” slide that has the events listed, but out of order. Ask students to make a copy of this slide and rearrange the events so they are in chronological order. If you are familiar with Carol Gaab, she uses a Reading Action Chain that is requires one to sequence events, but allows for a “multiple chronology.” This would be great to use collaboratively so that everyone can see all of the various chronologies that they can come up with. Follow up option: add details to each event and create an original classroom story. Describe an image Choose an image and have students describe the image. They could do so by listing 3 adjective or writing a set number of sentences about the image. Follow up option: teach students how to combine simple sentences to create more complex sentences. Translate Ask students to translate (L1 to L2 or vice versa) a few sentences. Yes, they can all translate the same sentences. When used as a warm-up or quick activity, you can see - in live time - which students are translating quickly, meaning acquisition of language, and which don’t start until others have posted, meaning acquisition has perhaps not been completely attained. Follow up option: pop up grammar explanations. Details Ask students to recall two details from a story you have been working with. Oftentimes, if they see what someone else has written, they will choose a different detail to share. (sidenote: When I ask students to do this on paper, I get very little sentence variation, but using this method, I get a lot of variety.) Follow up option: “before or after.” Ask students if “Event A” happened before or after “Event B.” Personal Question and Answer Ask students a few personal questions and have them respond. Follow up option: an extended PQA session Enjoy collaborating! |
Jessie Oelke
#deptofone providing compelling and comprehensible input Enter your email address to subscribe to this blog and receive notifications of new posts by email.
Categories
All
Archives
April 2020
Providing guidance
Aventuras Nuevas
by Bethanie Drew The Language Coach by Amy Lenord Bryan Kandel TPRS by Bryan Kandel Bryce Hedstrom's Blog by Bryce Hedstrom CI Peek by Carol Gaab Creative Language Class by Kara Parker & Megan Smith La Clase de Sra. Dentlinger by Elizabeth Dentlinger The Comprehensible Classroom by Martina Bex Grant Boulanger's Blog by Grant Boulanger Kristy Placido's Blog by Kristy Placido Maris Hawkins' Blog by Maris Hawkins El Mundo de Birch by Sharon Birch Musicuentos by Sara-Elizabeth Cottrell Mis Clases Locas by Allison Wienhold Making Good Mistakes by Courtney Johnson MJ's Comprehensible Input by Michele Whaley My Generation of Polyglots by Mike Peto PBL in the TL by Laura Sexton Somewhere to Share by Carrie Toth Spanish Nobility by Jason Noble Teaching Spanish by Kara Jacobs Todally Comprehensible Latin by Keith Toda Tripp's Scripts by Jim Tripp |
 RSS Feed
